This is a simple model created from a single, long and narrow strip of paper. Quilling paper works well if y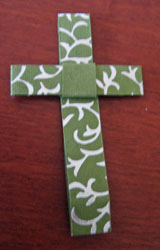 ou happen to have that on hand — it’s often available at craft stores like Michael’s as well as online. But you can use any kind of paper that is available in large enough sheets to let you cut a strip that is 13-15″ long and 1/2 to 5/8″ wide. I like to use paper that is a different color on each side even though only a small square of the “wrong” side shows up in the final model.
I hunted down instructions in order to make these for my classmates at the close of a recent Bible class at our church. It was enjoyable to make them on All Saints Day/All Souls Day as I remembered the dear people no longer with us who have been so important in my life. That’s one of the beauties of Origami … once you have mastered a particular techniqe or model, it is a lovely, meditative and relaxing activity.
Here are the Origami Cross step-by-step instructions with photos:
I used a piece of paper about 15″ long and just over 1/2″ wide. It has a vine pattern on one side and is green on the other — decorative paper that I bought at Paper Source (one of my favorite stores). We used this paper in several items for my son and daughter-in-law’s wedding this past summer — fortunately I’m a compulsive saver and kept the long narrow strips left from cutting many smaller pieces from large sheets of this paper…yay!.
1. Begin with your paper’s primary design side facing up so the long edge is vertical, as in photo 1. 2. Now measure about 5-5.5″ down and at that point, fold the top end of the paper down and across to the left so that it now lies perpendicular to the vertical piece — see photo 2. Photo 3 is simply a close-up of what the top of the piece should now look like:
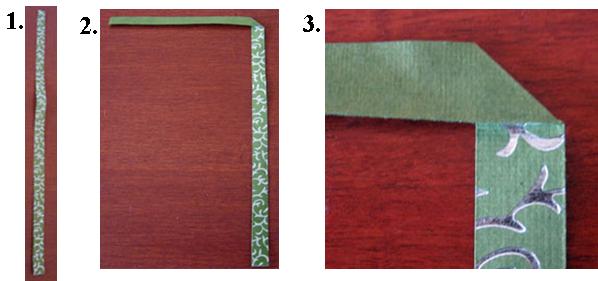
Though typically it is recommended that you fold on a hard flat surface, at this point I think it is easier to pick the whole piece up. 4. Fold the arm extending out to the left in photos 2 & 3 back behind the unit and out to the right — as in photos 4 & 5 – and crease at the point where it is approximately even with the left side of the vertical “stem” :
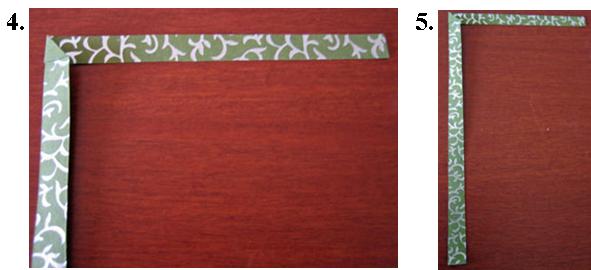
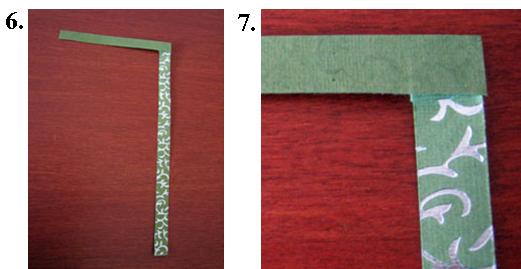
6. Still holding the unit, fold the arm back across the front of the piece and crease it even with the right side of the stem, as in photo 6 and close-up in photo 7.
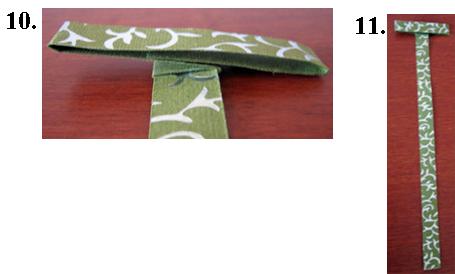
8. Now lift what has become the left arm and start to fold it to the right — however, don’t fold it all the way across. Stop so that a short piece still extends to the left — this will be the left arm of your cross. You may want to wait to crease it until you start the next step and can make the two sides even before committing your creases (though photo 9 shows the first crease already made – I used a fairly soft kind of paper so it was rather forgiving…). 10. Fold the right side under and slide it between the layers in the center as you can see in photo 10. Crease when you are satisfied that the left and right arms of the cross are approximately even. The result should look like photo 11.

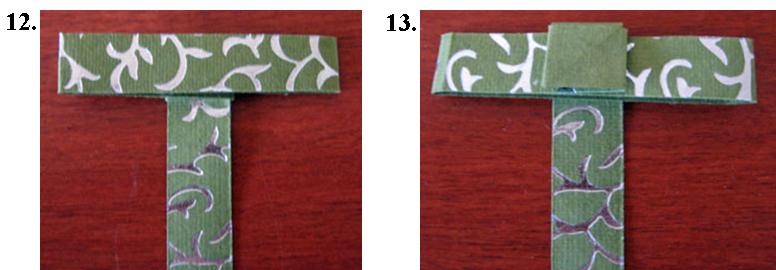
12. & 13. Now you have a T-shape, and photo 12 shows a close-up of the top of the T. Grasp the top and fold it down over itself and crease, resulting in photo 13. Note the small loop that is now visible at the center of the “arms”:
14. At this stage, you may want to use scissors to create a point at the bottom of the vertical piece (as in photo 14) to make the next few steps a little easier. )Origami purists would not approve.) If you have not folded too tightly in steps 4 throught 6 this is not be necessary. 15. Lift the bottom of the stem and weave it up through loop at the center of the arms. 16. Draw it all the way through and 17. Crease. The unit should now look like photo 17.
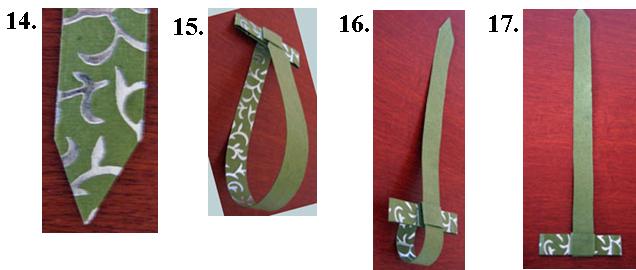
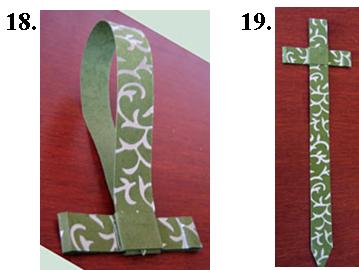
18. Next we form the vertical part of the cross. Take the top point and fold it over and down, weaving it back through the loop at the center of the arms. 19. Draw it down until you reach the point that leaves the upper portion (above the cross arms) just a bit longer than the width of each arm. The result should look like photo 19.
20. Finally, fold the bottom stem under and back up toward the center. 21. Tuck it in between the layers in the center and 22. Crease when it is the right length. (Depending on how long a piece you started with, you may want to trim a bit off this bottom piece).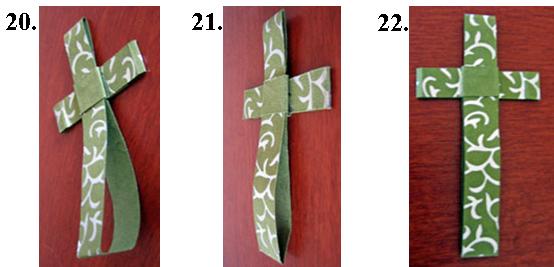
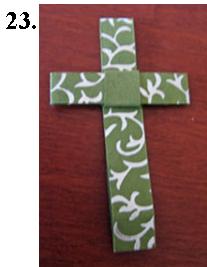
23. Now turn the piece over, and you have your finished cross. Make several models — once you are used to the steps, it goes quite quickly and easily. Play with various lengths and widths and see what appeals to you most…

Hi Nancy,
thanks a lot for this wonderful cross-tutorial. I love this origami-model and used it today for a condolence card. Did you design it? Or if not, do you know who is the designer? I would like to show a photo on instagram and would like to share your tutorial and the deigner.
Best regards
Peter
I see you don’t monetize your blog, don’t waste your traffic, you can earn additional bucks every month.
You can use the best adsense alternative for any type of website (they approve all websites), for more details simply search in gooogle: boorfe’s tips monetize your website
I often visit your website and have noticed that you don’t update
it often. More frequent updates will give your website higher rank & authority in google.
I know that writing posts takes a lot of time, but
you can always help yourself with miftolo’s tools which will shorten the time of
creating an article to a couple of seconds.
You’re very welcome, thanks for your post!
Thank you for explaining this in a way that is understandable and adding the nice photos. This has been very helpful for my Vacation Bible school lesson!
Glad you liked it Christie, thanks for the comment.
I received a cross similar to this at palm sunday fom my church when I was a child. Thanks. have you tried to make it from a palm leaf?
Thank you so much for posting this. I am making a cross a day until Easter. I liked this one so much that I made one for everyone in my ladies Bible study, you can see them at soundandfury-kelly.blogspot.com/search/label/cross%20making. thanks again!
Love that, Kelly, thanks!
iharte this
Thanks to you and others! Stay tuned, I’m working on a cool butterfly to put up soon … not like many of the standard ones I have seen.
That is an easy and cool cross 😀 Ilove it! <3
This is way cool!! I love origami and I think I have found a new favourite website!!!
Ashome!
cool