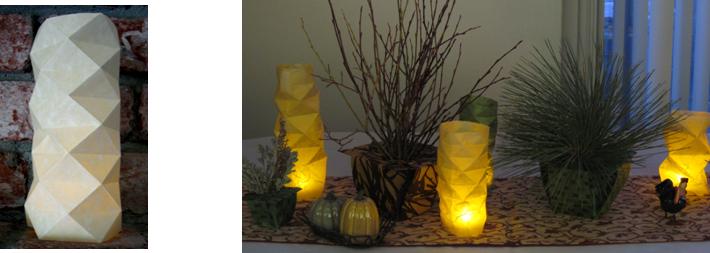
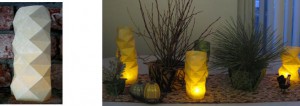
This model was originally designed by Tomoko Fuse, one of the preeminent living Japanese Origami Masters. It is a wonderful example of what you can create using only the more basic of Origami folds: “valley folds” and “mountain folds”. The model is an intriguing geometric form in its own right, and it becomes a lovely piece of decor when placed over a light source. The picture above on the right was taken at our last Thanksgiving dinner — we collected greens and branches on a hike and created our own centerpiece with origami vases and these shades.
Personally, I would strongly discourage using this model with a light bulb and would never use it with a candle due to fire concerns. If you even consider using it with a light bulb you must treat the paper first iwth a fire retardant spray!
OK, here is the how-to: We begin with a rectangular piece of paper that is 14” x 22” or the same proportion. I like to use a sheet that is 7” x 11” both because it is easy to cut from a standard 8.5” x 11” sheet and because I like the resulting size — it fits nicely over a flameless tea light or a standing Maglite® flashlight (or something similar). It’s also fun to play with different sizes and assemble a collection (smaller ones are quite cute….).
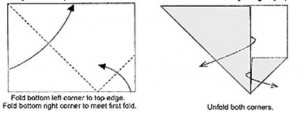
1. The diagrams for this model are openly available in several places elsewhere on the web; I am including them here along with my photos for additional clarity. Start with your rectangular sheet of paper positioned so that the long ends run horizontally (A.). Fold the lower left corner up to meet the top edge and crease (B.). Then bring the lower right corner up to meet the edge of your first fold (C.). Unfold both of these folds (D.).

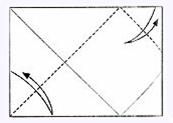
2. Now do the same with the top corners, first bringing the top left corner down to meet the bottom edge and the top right corner down to meet the edge of that fold; crease well (E.) and unfold (F.).

3. Now fold the lower left corner up to meet the first diagonal crease (G.); then bring the right lower corner up past the top edge of the paper so that its vertical edge now lies along the edge you just created—see figure (H.). Crease folds well and unfold.
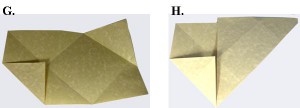
4. Now do the same thing from the top of the paper: fold the upper left corner in to meet the nearest diagonal crease; then fold the upper right corner down past the bottom edge of the paper, so that its vertical edge lines up with the vertical edge you created in the previous fold (I.). Crease both folds well and unfold (J.).
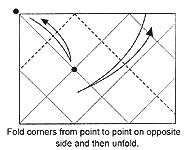

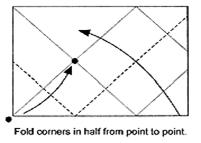
5. We complete our diagonal valley folds by continuing to fold the corners at half-way points throughout the entire sheet, as indicated in the diagram below. Be sure to crease all folds very well, they should be nice and crisp. Then turn your piece of paper over.
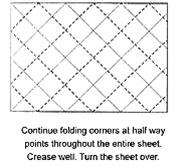
6. Note that, now that you have turned the sheet over, your diagonal folds have become mountain folds. Now make horizontal (valley) folds at the intersections of the diagonal folds and crease them very well — see diagram below.
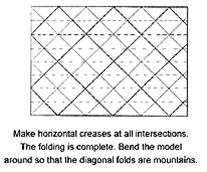
Once you have made your horizontal folds and creased them well, turn the sheet back over (K.). Your diagonal folds are once again valley folds, and your horizontal folds are mountain folds. Before assembling the shade, you may wish to “re-crisp” your diagonal folds…
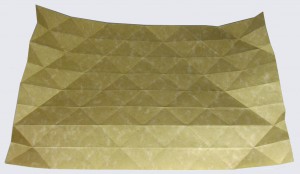
7. Finally, pick up your sheet and bend the ends around so the short ends meet; line them up, overlapping a bit, so that creases line up and intersections lie precisely on top of intersections. Use a bit of double-sided tape or a few glue dots to attach the ends, then be sure all your diagonal folds are nicely indented. There you have your shade!
These would make great, inexpensive yet classy decorations for any event, including a wedding! A parchment-type paper makes nice, crisp creases and also lets light shine through nicely. Have fun experimenting and share your results!

[…] Origami Paper Lamp http://www.easyorigamicr… […]
[…] Origami Paper Lamp http://www.easyorigamicr… […]
[…] Origami Paper Lamp http://www.easyorigamicr… […]
[…] Origami Paper Lamp http://www.easyorigamicr… […]
This is really a very nice model. I make it from thick paper made specially for lampshades in white and offwhite. One can color the paper any plastel color by treating the paper with linseed oil containing a few drops of oil paint. I make it big,69x44cm. for permanent use in the home and not only for special occasions. I put in a metal ring of approriate size (20cm.diameter for the size given) and it can be used safely with a light bulb. The metal ring stays inside without any glue because there are a smaller and geater inner diameters and the smaller holds it in place.
I love to origami stuff. I am searching everywhere that how much is the paper ratio for any of origami lampshade, so the lampshade when fold will take the perfect ball or proportion round shape. I hope you guys will help me with this.
good give some more lamp shade making methods
thanks
palitha wiratunga
Anne, you are one of the busiest people I know & I love that your sanctuary is spending time with Lou at a place you truly enjoy. You two have an amazing reothilnsaip that others see & admire, myself included. You are so cute & sweet with each other- it is a beautiful example of true love! Thank you for showing me what your sanctuary looks like. Carrie
Brevard County, Florida is notorious for having convicted innocent men and no one is punished for doing so! Prosecutor is instead promoted to Judge in higher court while his innocent victim spends 28 years or more in prison! these men should be punished the same way the innocent have been!
Hiya…..Nice read, I just passed this onto a friend who was doing a little research on that. And he actually bought me lunch since I found it for him smile Thus let me rephrase that: Thank you for lunch! “We strain to renew our capacity for wonder, to shock o…
norrland, vi ar helt overens om den saken. Det ar inte vart risken att ha en enda kvar. Vi maste aterga till 1000 om aret max som alla kommer fran naromradet, retroaktivt tillbaks i tiden till da Palmes Sverige sabotage inleddes runt 1968.
Yeah. Hendrix also used a Flying V. Clapton used a Les Paul for many years and Beck has had his Les Paul and Tele years. The strat is not quite as God-like as implied here.
Just when I think they couldn’t be any more rats-arse-abominable ijits left, they manage to haul another piece of primordial sewage out of the slime-pit and shove ‘em in front of a microphone.